Tuesday, September 25, 2012

1964 Raleigh Sports Finishing Rust and Dent Repair and Painting / Cleaning up the Bits

Hello and Welcome, Now that the dent and rust repairs are finished, I can finally get this old Raleigh Sports painted. When I left off I was going to touch up the filler on the fenders / mudguards just one more time.
Above: Here I have added another coat of Bondo Galzing /Spot Putty to the lower mud guards. I am hopeful this coat will finally give me the shape and finish I have been looking for.
Above: I cut this little filler and putty spreader from a larger one. This is about 1/6 of the original spreader size. This worked very well for filling the numerous small dents on the mud guards (fenders). I started with a 1/2 of a plastic spreader (3 x the width of this one) that I had heated up so I could shape it closer to the fenders bevels or curves. It worked ok but not great.
Above: After 2 filler layers and two or three spot filler layers I have finally got the fenders looking pretty close to their original shape. Now I can get get everything painted and start making some progress with this restoration.
Above: After getting the chain guard sanded and primed I touched it up with the spot putty and re sanded and sprayed the primer again. On my first attempt at painting this, the paint splattered due to a damaged nozzle stem. On my second attempt (new can) I over sprayed and the paint ran a bit in one spot. So I re-sanded and touched up the primer and tried again. The New Rust-Oleum "Professional Enamel" is a higher volume spray, it caught me totally off guard. After my third attempt I am finally satisfied with the finish on the guard. Now I can get on with the rest of it.
Above: After all the trouble I had with the chain-guard, I was probably over cautious with spraying enamel on the frame and fenders. After the first coat I let it dry for 48 hours before respraying. I gave it some extra time as the weather here has cooled off quite a bit. So now I will let these dry another three days before "ever so carefully" handling them.
Above: While the paint is drying I will use the time to clean and polish all the chrome. And also to wheel brush all the little nuts and bolts and other little pieces I am hoping to to reuse. The handlebars look pretty good for 48 years old. They are "nicked up" a bit but they still polished up pretty nice. So for now I plan to reuse them. None of the salvaged ones I saw on e bay looked any better to me.
Above: I am always amazed by how well old "good quality" chrome parts clean up. I expect I will need to replace all the little nuts and bolts for fender mounting etc. As they all look really rusty.
Here is a "before pic" of the lantern hanger bracket and stem. That green looking stuff on the stem turned out to be old Scotch Tape. That was a pleasant surprise, to say the least.
Above: I think for 48 years old, this lantern hanger bracket looks awesome! Just a few minor scrapes and some pitting. Just enough to give it some character. Overall it still looks and shines up pretty damn good.
Above: Click on this pic if you can for a close up. Here is a shot of the bent fender strut (black arrow) that I was able to straighten using the bench vise . But what I really want you to see is the (Red Arrows) fender mount bolts and nuts. I was 95% sure I would have to replace these.
Above: I cleaned these up using the fine brass wheel brush on the Black and Decker18V rechargeable drill/driver. This is the difference between good hardened steel and the rubbish that you find on cheaper bicycles today. These were not even chrome plated (maybe zinc plated) but they were pretty rusty so I can not be sure. Just amazing!
Above: I cleaned up the crank (on the bike) when I first bought it. And then again (with de-greaser) after removing it. So basically I just did a wee bit of brass detail brushing before polishing it up using the T-280RA Turtle Wax Chrome Polish & Rust Remover . I really love these old British Cranks with the makers logo built in. The old BSA cranks are really cool too!
Above: While waiting for the "Bondo" glazing and spot putty to cure, I mounted the new Kenda K40-HP Street Wire Bead Bicycle Tire, Gumwall, 26-Inch x 1-3/8-Inch on the reconditioned wheels. I also replaced the rim strips and installed new Kenda 26 inch inner tubes . I think these are going to look great. I do not think gum walls were original equipment on this bike, but I am not concerned about that. I just really like the way gum walls look on classic style bikes and I probably always will.
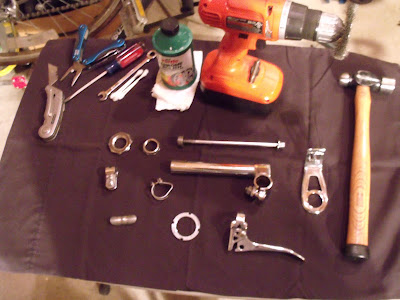
Above: I cleaned out my pliers/channel-locks /cutting tools drawer (temporarily) to keep track of all the parts as I clean them up. I will not be able to start reassembly until the new bearings arrive.
Above: Today (now that the paint is dry) I went ahead and did the Gold detail around the lugs. I probably over did it, but that's ok because I like it :) the paint is Testor's modeling paint Gold
Above: I finally decided to go ahead and paint the lower rear fender white. I made the curve by first placing a piece of 3M Scotch blue painters tape on a sheet of wax paper. Then I scribed the curve using a compass. Next I cut out the curve using an X-Acto knife . Then I was able to peel off the piece I needed and transfer it to the fender. Then I just taped off the rest of the fender and struts with newspaper and masking tape. Before spraying I did lightly sand the area (after taping) with 400 grit sand paper. Then wiped it clean of course. And I used Rust-Oleum 252467 Semi Gloss White Enamel over Enamel. You Do Not want to paint over enamel with lacquer....Ever.
Above: I thought I would show you some of the other cool stuff I have ordered for the Sports. I found this bicycle fender mount reflector on e bay the other night and could not resist. This should look really good just below the rear fender Raleigh decal.
Above: I ordered these cork grips . I am not liking the grips I already ordered and received all that much that. They look more like Schwinn grips than Raleigh. I will shellack these and they should look really good.
Above: I also ordered new 5/32 ball bearings 25 grade for the headset and the crank. I will not show both sizes, as they look pretty much the same.
Above: I also ordered this new Sturmey Archer 3 speed shift cable and housing which comes with all the necessary hardware. (or so they tell me)
Above: Here is my new incorrect Sturmey Archer 3 speed shifter . It matches the incorrect one that was on the bike when I purchased it perfectly. I may replace this eventually. Also I should mention I haven't a clue as to how this connects to the shift cable. I might have to check my bicycle repair book Park Tool Big Blue Book Of Bicycle Repair which I have rarely used. Except for to cut vinyl trim tape on the "wax paper like" cover.
Above: No I wasn't kidding. I am sure it is a fine book and I think I might have even used it once or twice. However in all honesty, my first resource is always the internet. If I think something is going to give me trouble, I`ll take the lap top out in the shop with me.
Above: These are not the pedal blocks I wanted. But they will have to do until I can locate a set of the genuine Raleigh blocks. They are the longer men's size blocks which may take me longer to locate. Also being an older model they do not have the reflectors. The pedals are also the old English tread which are getting harder to find at an affordable price.
Above: I was able to mount the rear mud-guard this afternoon. Today is Tuesday, I started this post Monday night. The white paint only had one evening to dry.
Above: I had a propane radiant heater going last night in the shop and a fan blowing on the fender as well. It dried really well for one evening. I think that we are all caught up with my progress so far. Unfortunately there is not much I can do now until the bearings arrive. Until next time Please RIDE SAFE and Remember to Always.......RESCUE, RESTORE & RECYCLE..........Cheers,Hugh
Above: Still my favorite Raleigh "so far" the 1970's Sprite. I hope the new owner has been taking good care of it. ATTENTION AMAZON SHOPPERS! You can help Support This Blog by simply logging onto Amazon dot com using the "Amazon Search Box" located in the Top Right Corner of This Page. It will not effect your cost and I will receive a very small commission. Thanks for Your Support. Cheers

Thursday, September 13, 2012

1964 Raleigh Sports Restoration / Preping the Dented Mud guards and Chain Guard for Paint

Hello and Welcome, The 1964 Raleigh "Sports" has presented a few new challenges for me. The chain guard and mud guards (fenders) are in pretty rough shape. They are going to need some attention before priming and painting. I have absolutely no real experience with "bump and paint" work so this should be really interesting and challenging.
Above: My first thought was to try to locate a replacement chain guard. But being a 1964 I would imagine that if anyone has one in pristine condition they would want a pretty Penney for it. (a lot of money) So being the cheap SOB that I am, I decided I should make an honest effort to refurbish it first. First step is to remove all the paint and get a look at what I have to work with.
Above: Here I have removed the paint using 220 grit automotive grade wet sanding paper and the fine brass wheel brush (safety glasses) on the high speed drill. Then to straighten the bottom lip I placed the wavy part of the lip on the inner edge of the outer jaw on my bench vise . Then I gently tapped it straight using a ball peen hammer. To smooth out the flat part or face of the guard I slipped a scrap piece of 1x6 rough sawed cedar with the smooth side facing up in between the front and back of the guard. This gave me a hard smooth surface under the metal to help me hammer out the high spots. Fortunately I have a auto body hammer that is designed specifically for this type of work.
Above: On the left my ball pein hammer. On the right is the metal working hammer. I found the bump and paint hammer at a Thrift Shop or Garage Sale. At the time I had no idea what it was for. But it looked like it could be useful, so I bought it for a couple bucks. You can see the over sized striking surface on the metal work hammer. This works really well for flattening out the high spots. The opposite end worked well for tapping out small dings from the underside of the fenders. It was still necessary to use glazing/spot putty on these small dents and dings. However much less filler is used after raising the dent from the underside.
Above: If you blow this picture up you can see the creases and the small dents that I was not able to completely remove with the hammer. So I will need to use some filler, commonly referred to as Bondo (actually a brand name)
Above: This is the Micro Lite Body Filler I purchased from (NAPA) Highland Auto Supply. The large can contains the filler and the small tube is the hardener. I also picked up some plastic filler spreaders while I was there. If I had to guess I would say the mix is about 95 to 98 percent filler and about 2 to 5 percent hardener.
Above: My first attempt at spreading out a thin layer of filler on the chain guard face. My thinking was, if I use very little hardener I will have more time to spread the filler. The only problem with this plan was, 5 or 6 hours latter it had not even begun to set up. Normal set up time is about 15 to 20 minutes depending on the weather conditions. So that evening I removed all the filler from the guard and decided to call it a day. Notice the color of the Filler is white (not enough hardener)
Above: This is my second attempt after I wet sanded it smooth with 220 grit and 440 grit. You might NOTICE the filler now has a little color to it, that is the hardener. I probably should have touched it up first, but I decided to go ahead and spray the primer when it was dry.
Above: As Jeff had suggested on the Face Book Page, The primer really highlighted the bad spots. See what your missing if you are not visiting the blogs face book page. Lots of good information being exchanged there. So now I will wet sand the bad spots and do some touch up.
Above: After wet sanding the bad spots I have applied some glazing/spot putty. Here it is out side drying. It will be about 20 minutes before I can wet sand it again. Then I will let it dry another 10 minutes (after wiping it dry with a paper towel) before re spraying the primer.
Above: I intended to purchase the 3M spot putty. But our local Napa "Highland Auto Supply" carries the "Bondo" brand. I asked if this Bondo is basically the same thing? And they assured it is. And it seemed to work just fine. UPDATE: If you look at the bottom right corner of the tube you will see a very small 3M logo. So it appears that I had purchased the 3M without knowing it.

Above: Here I have finished wet sanding the spot putty and am ready to re-spray with Rust-Oleum 7578838 flat black primer when it is dry. For this wet sanding I used the 220 grit wet sand paper but only to smooth out the rough spots. Then I went to the 440 grit wet sandpaper and finished it off with the 600 grit wet sandpaper. (approximately) Now it is ready for what I hope is the last coat of primer.
Above: Not too bad considering this was my first time ever using body filler. Thanks to Jeff and Terry for all the great instruction. It was extremely helpful!!
Above: I ran into my friend Don this morning at the coffee shop. Actually I was hoping he would be there so I could pick his brain a bit. Don I believe ran a plant for GM and has restored several cars over the years. I told him that the fenders I would be working on had many very small dings and dents. And would it be ok to just use the 3M putty on the small dings and dents. He said if I use thin coats and make sure it dries before adding the next coat it should be ok. In fact he told me before the micro lite fillers came out they did it that way all the time. Because it was lighter than the Bondo that was available at that time. Sometimes it`s not what you know, but who you know :) that matters.
Above: I did use some extra filler to fill a larger dent in the lower back of the rear fender. But almost everything else is small and the spot putty should work fine. I should mention that I sanded the little dents with a gritter sand paper (appropriately 100 grit) before using the spot putty. And of course you want to wipe off any dust before using the putty or filler.
Above: After the first coat was good and dry,I went over all the bad spots again. At this point the weather has cooled a bit so I will let it cure over night. I will pick this up where I left off tomorrow.
Above: After the third application, I have sanded down the "spot putty again". I will go over it quickly with 600 grit wet sand paper and wipe it clean before spraying the primer. I will probably have to do one more touch up with the putty after the primer is dry.
Above: The fenders are looking really good. There are still a few spots that I will need to re-sand and use the spot putty on. But at least I am finally starting to see the end result. I could probably just paint them "as they are now". But why stop now when I am so close?
Above: I have finally painted something! Here I have the fork clamped into my PCS 9 Park Tool Work Stand (by the steerer tube) baking in the sun. Here is a Quiz: If a tiny insect lands on your piece while it is drying and gets stuck, what do you do? Answer: Absolutely Nothing! I guarantee, you will do more damage to the paint trying to remove the little bugger than it could ever do. Just leave it alone. And when you wipe it down 72 hrs or so latter, you probably will never be able to tell where it was.
Above: Here I am checking the chain guard decals for fit. After looking at some other Raleigh Sports using Google image search, I know now I need to move them a few inches or so to the rear. But the guard has not been painted yet, so it will have to wait. I just wanted to get an idea of how they will look.
Above: Here is the entire set of Raleigh Sports decals I purchased from Cyclomondo. These are for a more modern model 1970's perhaps. But they will do fine. I was unable to locate a set for a mid 1960,s Raleigh Sports. However if I do ever sell the bike, I will inform the new owner for sure.
Above: Just before sunset I moved the fork back into the shop/garage. The paint felt dry to the touch. So I carefully removed the 3M Scotch Blue painters tape from the thimble like fork detail. The white you are seeing is not primer that was not painted over. It is glare, the primer coat(s) are flat black.
Above: The Brooks Flyer saddle arrived earlier in the week. While some of my face book friends seemed concerned about it, I actually like the black springs and rails. It really gives it that "really old school" look. Before chrome there was Black and Red pin striping or paint detail. I am reminded of something I heard back in my motorcycle days from an old biker. When discussing the latest piece of chrome bling I had just put on my old Iron-head, He simply said... "Chrome won`t get you home". Obviously he knew what a p.o.s. that old AMF Iron-head was...LTMS
Above: I found these handlebar grips that look more like cheap "Old Schwinn" knock offs rather than something that you would use on a vintage Raleigh. I will probably go with cork grips and maybe an old style brass stem mounted bell.
Above: Something like this is what I have in mind. And maybe a small retro looking tool bag. Canvas and leather might be cool. Well that brings us up to date on the 1964 Raleigh Sports restoration. Until Next Time, Please RIDE SAFELY and Remember to Always.......RESCUE, RESTORE & RECYCLE. Cheers, Hugh P.S. Did you know Jim Thorpe was one of the pirates in Captain Blood? (uncredited)
ATTENTION AMAZON SHOPPERS!! You can help Support This Blog by simply logging onto Amazon dot com using the Amazon Search Box located at the Top Right Corner of This Page. It will not effect your cost and I will receive a small commission. Thanks for your support, Hugh
 
Cycling Blog Directory