Tuesday, May 29, 2012

Rusty Raleigh Sprite Restoration Part 1

Hello and Welcome,
I am restoring this 10 speed Nottingham Raleigh Sprite for Brian. Brian is the fellow who purchased my GIANT Attraction mountain bike earlier this spring. This Raleigh was apparently left outside for an extended period of time. It was badly rusted to the point where I had serious doubts about whether or not it was worth restoring. The first thing I did was take it apart and make sure the bottom bracket and headset were serviceable. As it turns out they are both savable I may need to replace the bracket spindle or axle. And it will no longer have a chain ring guard (or at least the same chain ring guard) And I may need to replace all the bearings. But all this is manageable, I guess.
Above: Here is the Sprite looking as if it doubled as a boat anchor for a couple summers. Mt first instinct was to pass simply because it needed so much replaced. But I decided to see how much I could replace using salvaged components that I already have in the shop. As it turned out I have both wheels. The rear is a perfect match to the rear wheel that is on there now (minus the rust). And I have a front wheel that I think will actually look better than the one that is on it now. Mine has a higher flanged hub that looks more retro. I also have both derailleurs, well sort of.
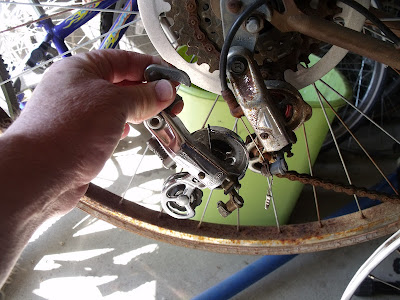
Above: The company that manufactured the rear derailleur for Raleigh manufactured virtually the same derailleur for Schwinn. And all things considered, I think it will do fine.
Above: My good fortune continued "or even improved" with the front derailleur. It turns out I have what appears to be the exact same Huret front derailleur in my collection of salvaged and take-off front derailleurs. This is important because, the amount of replacement parts needed "if purchased" would make this restoration way to expensive to attempt. Now for the brakes. So much of the brake caliper's hardware (springs, barrel adjusters, mounting bolts and nuts etc.etc.) has deep rust that they are not worth trying to save.
Above: At first glance, my side pull brake calipers do not look much better. But trust me on this one, these will clean-up nicely. And although mine are Dia-Compe and the originals are Weinmann they are of equal quality. And "design wise" they are a real good match.
Above: I did not run into any surprises until I got a closer look at the lower inside blades on the original fork. This rust is too deep and in a really bad spot. There is no way I can use this touring road fork. I knew this was going a little too well!
Above: This is really incredible! While the drop-outs are on a slightly different angle. Laying side by side the rake on the two forks is nearly identical. And this is Really Cool, The steerer tubes from the crown to the top of the tube are exactly the same length and size. I quickly tried it for fit and realized the crown races would need to be switched. So the very next day (at Cycle Therapy in Waterford Mi) I had the crown race removed and replaced with the crown race from the Raleigh fork. Then rushed home to mock it up and see if it would work.
Above: And it did work! The Bicycle Gods are shining down on me again! The original stem could not be removed! After lots of penetrating oil and tapping and twisting, I gave up and cut the S.O.B. off. I replaced it with this very "Vintage English" looking stem which I found in my tub of salvaged stems. This is why I try to never throw anything away that I think I may need at some point down the road.
Above: I really do not want to purchase new fenders. I have to repaint the frame and fork and the money is just not there. While the fenders are rusty, and the once Bronze metallic paint now appears to be a light brown. They are not dented and the struts are not all mangled. So I will try to save the touring bicycle fenders before I continue on with the frame. Lots of sanding ahead! and some wheel brushing as well.
Above: Here is the front fender after sanding and priming drying outside in the sun. Not too shabby! Looks like all I will need to replace on the fenders is the bicycle fender mounting hardware.
Above: After the Rust-Oleum Gloss Black Paint was good and dry (about 48 hours) I hung the fenders up high and out of the way so nothing bad will happen to them before I need them.
Above: A shot of the fork sanded and ready for primer. I used the fine brass wheel brush on the high speed drill to remove the paint from the area around the lug work at the top of the fork blades. You will need to wear safety glasses or goggles for that job. And a respirator (mask) if dry sanding.
Above: I like to use 220 grit (automotive) wet sanding paper followed by 400 grit and then 600 grit. This will give me a nice smooth surface for primer and paint.
Above: The fork primed and ready for paint. This is the third bike and second primer and re-paint for this fork. This is the same fork I used on the "Stars and Stripes" fixed gear bike. Which I later cannibalized for the red lugged frame fixed gear bike.
Above: The fork drying outside in the sun. The white areas you see on the fork are glare, not missed-paint spots. And no I did not paint the fork next to my wife's car.
Above: Here is a shot of the bottom bracket shell cleaned out. I coated the threads with grease to protect them from moisture / corrosion. The drive side would not budge. Not wanting to do any damage with my adjustable wrench I decided to leave it alone and clean it up in place. They do not give you much to lock onto on the right or drive side cup for removal.
Above: I did not have a bicycle seat post that fit the seat-tube. So I used the fine brass wheel-brush and some Turtle Wax Chrome Polish / Rust Remover to clean-up the original. For some unknown reason the size is not engraved or stamped on the original post.
Above: Here I am wet sanding the frame. I keep a rag handy as the wet sanding will smear the paint. So I need to wipe it off often to see how I am doing.
Above: Here I am rinsing paint off a piece of 220 wet sand paper so I can get the maximum use out of it. I probably used about 8 full sheets of 220 grit on this frame. I use much much less of the finer paper to smooth the finish. The great thing about wet sanding is it really keeps the dust down.
Above: To remove the paint around the head badge I use a single edge razor blade. Them finished it with a very small folded piece of sand paper. I plan to tape over the badge trimming around the perimeter with an X Acto knife before spraying primer and paint.
Above: Here is the frame "pretty much ready" for primer. I will probably do a little more touch-up before I put the primer coat on it. I will also wipe it down first "very carefully" to remove all the dust before spraying.
Above: I do not recommend you remove the cotter crank pins in this manner, especially if you are not experienced. I use penetrating oil, a lug nut and a large heavy duty C Clamp and a small propane torch. I have learned to give it a little time, it usually pops the pin loose when I least expect it. When the pin breaks loose the clamp and nut and pin all fall on the floor. So I am careful not to leave anything breakable underneath.
Above : Early on I put my wheels on to check for fit. The rear wheel was originally going to be my replacement rear wheel for the Parliament. But it has a little pitting. So I refurbished the original wheel after I found-out that Joe at American Cycle and Fitness in Pontiac had the correct (1969)free wheel removal tool. But even with a little pitting, this wheel is a hundred times nicer than I could ever make the original. So that's about where I am at with the Raleigh Sprite. Tomorrow I prime and paint the lugged frame. Then I will get busy with the crank and headset.
Above: I added a rack bag to the single speed/fixed gear "touring style" commuter bike. Now I can bring along my camera every time I ride. I have already missed a couple of really good photo ops this spring. Eventually I will add cheap panniers to the rear bicycle rack for running errands. Can you spot what is not quite correct on this bike? I should have much more progress to post on the blog next week. So Until Then Please RIDE SAFE and Remember to Always....RESCUE, RESTORE & RECYCLE! Cheers, Hugh

Saturday, May 26, 2012

The Finished Classic Red, Lugged Frame, Fixed Gear / Flip Flop Cruiser Bike w Saddle Complete

Below: The little red classic single speed/fixed gear bike is finally finished. I gave up on waiting for the first saddle to arrive from China and ordered another saddle locally. The China saddle did finally arrive after a nearly two month wait. I like the second one better anyway. I`m sure the China saddle will be put to good use eventually.
Below: I did still have the ding in the top-tube to take care of. My plan was to sand it to the metal. Then fill it with J.B. WELD. Then file and sand it down flush. I was not sure how this would go as I have never used J.B. WELD for repairing a ding before.
Below: The ding sanded and ready to be repaired. It is important to expose the bare metal so the J.B.Weld has something to bond to. I sanded a slightly larger area than the actual ding. In masonry I would call this "feathering" the repair. This makes it easier to make the repair smooth or even with the un-repaired area around the damaged area.
Below: After filling the ding with J.B. WELD. The package says you can file or sand this after 30 minutes. I gave it a little extra time due to the cool weather.
Below: After I filed and sanded it down flush I decided to hide the repair with a piece of black vinyl 3M trim. This trim will also act as a top tube protector.

Below: When applying the 3M Trim and Detail tape I was careful to keep it centered on the top of the tube. I ran the tape past the end of the lug and cut it in with an X Acto knife for a professional look. I also made the graphic on the seat tube with the 3M detail tape.
Below: Here the 14 tooth fixed cog is on the drive side. Notice the axle is pretty much all the way back in the drop-out. Seeing all the drop-out I had to work with I went with a larger 18 tooth free-wheel cog. This just made sense to me. If I was tired or had some hills to climb and wanted to switch the wheel to the free-wheel side, I would want a larger cog for easier pedaling / hill climbing.
Below: Here with the 18 tooth free-wheel cog on the drive side. You can see the axle is now farther forward in the drop-out. But there is still plenty of drop-out to secure the axle properly. I think this is pretty cool being able to go with a bigger cog on the free-wheel side considering this is just a typical 10 speed frame.
Below: I am very pleased with the ODI Grips. The ODI grips do require assembly (some others do not) and they came with no instructions. I did find a video on the "you tube" showing how to assemble and install the grips. Even though this bike is a mix of the old and new, it somehow works out ok. I was not sure it would.
Below: The head badge hammered out from an old penny with a simple H engraved in it looks ok. At some point in the future I will experiment some more with homemade head badges. Adding black ink to the engraving was a mistake, I think it looks much better now without the unevenly blacked-in engraving.
Below: I removed the Avenir Pedals with traps so my friend Laura could take it for a ride "on the fixed cog". I like the look of these classic style touring pedals so much I decided to leave them on there. Of course the new owner will get what ever they want pedal wise. (within reason)
Below: This pic shows why I call it a fixed gear cruiser. With or without the front side pull caliper brake mounted, you won`t be spinning these handlebars around. Unless of course you actually want to break your bloody neck!
Below: A nice shot of the bike from the drive side. Finally a photograph where the front lawn has been mowed recently.
Below: A shot of the left side. And yes it has a alloy kickstand, which is removable by the way. I hear about that a lot from the no kickstand crowd. But I have 20+ bikes in my garage/shop at any given time. There just is not that many places to lean them. So get over it already :-)
Below: The bike as it was when I found it at a Thrift Shop. All in all I think it is a pretty cool transformation.
Below: At the end of the Roadmaster post I included a photograph of my current project, the Raleigh Sprite. It has been really challenging with a few surprises. Here is the frame ready for Rust-Oleum primer, which will have to wait as it is too humid for any painting right now. I found some original paint under the license sticker. It was at one time a beautiful copper with fine metal flake effect. I thought it had been a light brown. This Raleigh bicycle is "hands down" the most challenging restoration I have ever attempted.
Before this bike showed up I was planning on restoring a Fuji Grand Tourer SE. Now another Raleigh has taken it`s place in line. So it is going to be a little while. I think you are going to like the next Raleigh. It is also pretty rough, but not so bad in comparison.
Until next time Please RIDE SAFE and Remember to Always RESCUE, RESTORE & RECYCLE Cheers,Hugh

Wednesday, May 16, 2012

RoadMaster Star Rider Restoration & Making Room for Big Phat White -Wall Tires

Hello and Welcome, Working on "tank bikes" is new ground for me. I was part of the Schwinn Sting Ray to Big Fat 10 Speed generation. This Road master arrived minus wheels, block pedals, chain and a front fender also the headlight shroud was broken. It needed some rust removal and polish as well. Piece of cake! Normally I would have "taken a pass" on a bike like this one. But the young lady has been a regular customer and has brought me some good restore able bikes in the past. So what the heck, it is time for a change. I need to get out of the fixed gear mode I have been stuck in lately. At least for a while.
Above: Here I have mounted my vintage S-7 wheels on the Star Rider and also my vintage Schwinn block pedals as well as my old Schwinn / Messenger bicycle saddle. The wheels and pedals look fine but will need refurbishing. I do not like the idea of a Schwinn saddle on a Roadmaster. That I will change. First order of business is to find the headlight. If I can not locate one. there would be no point in continuing this project.
Above: This is what remains of the original headlights and shroud. Time to check the e-bay! Incredibly a fellow named Bill Andrews in PA had the identical bike for sale. And was asking a mere 45.00 for the whole shebang. Now purchasing the whole bike would have been great, but the shipping cost made that impossible. So I made Bill an offer He could not refuse. I offered him 60.00 if he would ship me the light and front fender. After not hearing back right away I e-mailed him again saying , If it is easier, just send the tank assembly with the light attached. (and the front fender of course) So thanks to Bill in PA for making this project possible.
Above: Here is the headlight shroud Bill sent. I have removed the light fixture so I could sand this and re-paint with metallic paint. The fixture also needed painting. It came with two working light bulbs. Not to mention the replacement tank was in better shape over all. When I saw how good the battery holder and wiring inside looked I began to think this light might actually work. We will get back to the light and tank latter.
Above: I love these old S-7 wheels, they have been stored inside for 40+ years. And they cleaned-up beautifully. I went over them first with a "fine" brass detail brush. Then went over them with Turtle Wax "Chrome Polish & Rust Remover". Afterwards I did the sidewalls (braking surface on a modern bike) with the "fine" brass wheel- brush mounted on the 18 volt rechargeable drill/driver. That is the only way to do the side walls, much faster and easier than hand brushing. I also cleaned up the hubs using the detail brush and the Turtle Wax.
Above: I thought about servicing this coaster brake hub myself. I don`t remember seeing a single speed hub with an oil port before. Also it has a "MARK IV" coaster brake. I`m more the "Bendix Brake" generation. I called Joe at American Cycle & Fitness in Pontiac Mi. and asked how much he would want to clean it out and lube it for me. About 20.00 . OK! Remembering my last experience with a (Chinese) coaster brake hub, I decided to let the "Old Pro" take care of it. After Joe told me about the internal roller-bearings and springs I knew I had made the right call. Joe does not know this but, he IS my "Go to Guy" for all things old and especially "old Schwinn". You might remember Joe, He was the only one who still had the correct removal tool for the ancient free-wheel on the 1969 Parliament. I regretted that I had to leave the wheel there, I was hoping to "watch and learn". But they were busy and I had commitments. By the way Joe said "It is a very high quality hub" and added "They don`t make them like that anymore."
Above: How nasty was this crank housing? Well it is the only one I ever used a Shop Vac and a Swiss Army knife to assist in the cleaning. The housing was full of dead bees (Shop-Vac). And the crud on the pressed in race was so hard the Mothers needed a little help freeing the old hardened grease (knife). I thought this must be the worst part of the job and the rest will probably be a breeze :) Yeah right!
Above: Eventually the housing and pressed in races were clean. As were the cartridge bearings and bits. Thanks to White Lightning "Clean Streak" and my "Parts Brush". The brush literally fell apart as I finished the 1 piece crank. At least the parts brush did not die in vain.
The Ashtabula crank cleaned-up nicely. It had no deep rust and was a fairly easy clean-up. Using Mother's Mag and Aluminum Polish on the sprocket teeth to loosen that "God Awful" grease. And Turtle Wax Chrome Cleaner & Rust Remover on the crank and arms, it came out looking pretty good.
Above: The hard grease nightmare continued with the threaded headset as well. After using Mothers and still having grease lines I decided it was time to try something else. The rotary tool with the fine mini "wire wheel-brush" did the trick. I needed to use the mini LED Flashlight to see what I was doing in there. The bearing cartridges were the same, lots of White Lightning and lots of brushing. Well Thank God the crank housing and headset were finally finished! Time to move on to something else. This was my first experience with 50 year old grease. Damn and I thought 30 year old grease was tough. hah!
Above: The rear fender had very light surface rust. The Turtle Wax did most of the work with just a wee bit of fine brass detail brushing. Finally I`m getting somewhere. Little did I know that I had a whole new set of problems lying ahead. Imagine that.
Above: The front fender comes to a slight point or crease in the center. It has some pitting but it is original equipment. And it will have to do, as this job is already way over budget. So I polish and re-polish it until I am satisfied that I have gotten all the shine that I am going to get out of it. Being the owner wants the original paint left alone, a little patina on the front fender should be ok.
Above: Here I have installed the new white grips. The beach cruiser style or touring handlebars and stem cleaned up nicely. I did have to replace the stem bolt and wedge nut. It did not want to come apart and while hitting it with a hammer (using a piece of wood to protect the nut head) I apparently stripped the threads on the stem bolt. The wedge nut was corroded so bad I decided to replace it as well. But that was not a big deal as I had plenty of old stems to steal parts from.
Above: The tank on the right from PA is much cleaner inside. And since the light fixture is wired to the inside workings, I will use it on the bike. Also the graphics on the outside are brighter on the replacement. "All in all" it will be a huge improvement.
Above: The replacement tank and freshly painted (metallic) shroud are a huge improvement over what I started with. The scratches in the paint annoy me, but it`s not my call. My idea was to paint the frame Robins egg blue and the tank, rack and chain guard white. Maybe next time (:
Above: My favorite part, the lights actually work. And I used the bulbs that were in it when it arrived. I don`t know if they even make the old flashlight style bulbs anymore.(I would think somebody does) The switch is a little sticky, but after 50 years I guess that's acceptable.
Above: I used every trick I could think of to make room for the phat 26 inch Beach Cruiser Whitewall Tires. Look closely and you can see I cut the brace/bracket deeper where the fender bolts up into it. I also made sure that the struts were raised as far as possible by making sure I used every bit of the elongated mounting holes. I also did this where the fender attaches the the brace behind the crank housing. I made sure I had it up as high as possible. I raised the rack the same way by using every bit of the elongated holes on the racks struts. This also allowed me to draw the fender up higher using a new bolt where the fender attaches to the rack deck. I also cut off all the excess I could from the mounting bolts inside the fender. Another problem was chain length. With the larger tires there was no room left to adjust the axle back farther in the rear drop-outs. So the chain length had to be near perfect. I also trued the wheels so they had little to no side to side movement. Even after all that "due to the tire not being perfect" I still had a tiny bit of rub on the inside forward chain stays.
Above: At this point I was out of ideas. Then I remembered something I had seen old motocross riders do in the movie "On Any Given Sunday". And I remembered seeing Burt Monroe do it in "The Worlds Fastest Indian". Shaving the tires or changing the tread pattern by cutting it to your specs using a single edge razor blade. I removed the outside tread on both sides of the rear tire being "very careful" not to remove too much rubber. I had noticed by looking at the dirt on the tire, that the "contact patch" did not include the outside treads on the tire. The "contact patch" is the part of the tire that actually makes contact with the pavement. So what I did was round off the tire just enough for it to spin freely between the forward inside chain stays. Above is the tire after I shaved it. The upside is the tire still has the "phat" look. And it finally spins free!
Above: To show the difference, here is the un-shaved front tire. The front was much easier and did not require shaving at all. The owner wanted the phat white walls and I agreed it would look really cool. But I had no idea it was going to be this difficult to make it work. I also ran the idea across a older friend of mine who was into motocross "back in the day". He said basically what I was already thinking "just be careful not to remove to much rubber" and it should be fine. I am in no way recommending that anyone try this. But I am glad I did. I was very careful and have no worries that this tire will hold up fine.
Above: A shot of the bike finished. The owner also requested a big comfortable Beach Cruiser Saddle and I think this saddle fits the bill. It`s not like this bike will used for any serious touring. "It is what it is" a classic cruiser.
Above: A shot of the bike from the front right. That new light shroud really makes the bike. Without the replacement parts this would not have been worth doing.
Above: I know it is not supposed to be, but this is the best side of this bike. This must be the side that was facing the wall all those years it sat somewhere.
Above: A shot from the right rear. I think the little blue reflector on the rear fender looks cool!
Above: I was going to pick something easier for my next project. But it did not quite work-out that way. The good news is.. This one is getting painted! I`m not joking, This really is my next project. Now if you were checking out the face book page you would already know that..LTMS Until Next Time, Please RIDE SAFE and Remember to Always RESCUE,RESTORE & RECYCLE Cheers, Hugh P.S. I do not publish "made-up" comments that are really links to online stores. Also be careful how much info you include in your comment. As they do get published.
 
Cycling Blog Directory