Thursday, September 29, 2011

GT Avalanche gets the full Zefal treatment

Hello and Welcome, I`m not going to mention that Hugh`s Bicycle Blog now has a Face-Book page. And I`m not going to mention that the quick-link is right there in the right column. Having not said that, Let me tell you about the Zefal make-over the GT Avalanche recieved, and why. I was at the local Meijer Store the other day and I spotted a Zefal saddle. I noticed it came with a bracket for a wedge bag. Then I spotted the Zefal wedge bag that fits the saddle. I`m already a big fan of the Zefal water-bottle cages for both style and value. As I looked around I saw a few other Zefal products. That is when I decided to do the full Zefal treatment on the GT.
Below: Some of the Zefal products I will be installing. From left to right. The Zefal light-set, under 20.00 (non rechargeable batteries included). The Zefal Comfort Saddle, under 18.00 (including wedge bag bracket). The Zefal water-bottle cages (under 8.00 each). The Zefal Wedge Bag about 10.00 (designed to attach to the saddle, right out of the box). The Wedge Bag also includes a sewn-on strip to hang the tail-light on. And Not Shown. I also purchased a Zefal mini frame-mount pump for under 15.00
Below: The Zefal comfort saddle is quite comfortable. Although wide in the the rear, the nose is narrow enough not to be bothersome. And it`s a good looking saddle as well. As you see the wedge bag is clipped on and the tail light is hung onto the strap.
Below: The Zefal wedge-Bag is just that easy to remove. You will want to make sure you feel it click into place when re-attaching it to the bracket. While the bag is not expandable, I have loaded it with a full patch kit (including multi-tool flat bar) a replacement tube and three Allen wrenches. And with the frame-mounted mini-pump, I should have everything I need to fix a flat.

Below: The Zefal front light has three settings, constant on - fast flashing and slower flash. I do not ride in the dark. But as a "be seen" light it works great. A few friends who have seen me out riding have already mentioned that is is a great attention getter. (I have the same light-set on my daily rider) Also it is easily removed and can be used as a flashlight or emergency signal light. In a cold climate you will want to bring the lights inside with you. That is no big deal as the front and rear lights both remove easily. The tail-light has the same three settings as well.

Below: The stylish Zefal water-bottle cages. As more mountain bikers are using the hydration packs these days, maybe cages are not "as necessary" as they once were. But for a short ride they are still very handy. And not everyone (including me) owns or uses a hydration pack. And a "Big Plus" for me, My favorite size Gatorade bottle fits the Zefal cage perfectly. Also Below: The Zefal frame-mount mini-pump. The included Velcro strap is for bikes that do not have the bottle-cage mount holes. I used it anyway for "extra" security. I have not used the pump so I won`t comment on the performance. But I will say this, Zefal has been making frame pumps for a very long time. I have no doubt that "although not as quickly as a full size frame pump" it will do the job more than adequately.
Below: The Bell removable mud-guard. The GT frame is a perfect match for this 5.00 add-on. The set is 10.00 But since I used the front guard on the GIANT, we will call it a 5.00 investment. And because of the triple triangle frame`s design that exposes seat tube just above the rear tire, the mud-guard fits this bike better than any other I have seen. That is one sweet mud guard for five bucks!

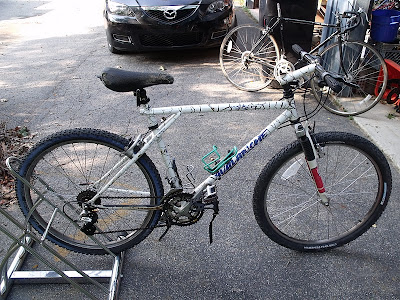
Below: The GT with all the Zefal accessories, including the "Bell" mud-guard. You are looking at an investment of about $83.00 US + tax. I know these are not "Top of the Line" accessories. But for the casual rider or someone who is on a tight budget.. They are the most "Bang for you Buck" that you are likely find anywhere.
Below: The Giant Attraction is now sporting a new Avenir rack and the Bell 5.00 front mud-guard. This bike has been a joy to test-ride. I`m gonna miss this one when she is gone. I think the only thing I would do differently if I were starting this build tomorrow.. Is go with a higher pressure tire. These max-out at 35 lbs psi. Although I could probably sneak a few extra pounds in there. But next time it is going to be Kenda for sure! Oh wait, The GT was next time! And it has the Kenda Kross Plus which I think hold at least another 20lbs psi. That was a good choice, and they were on sale too!

Below: The Motobecane Nomade is coming along fine. I should start posting the restoration real soon. It has been great working on a vintage road bike again. I have more experience with these, so it is less challenging and also a lot less stressful. So I might slip in a few more road bikes before working on the Specialized Rock Hopper FA.
Until Next Time Please RIDE SAFE and Remember to Always RESCUE, RESTORE & RECYCLE
Cheers, Hugh

Saturday, September 24, 2011

GT Avalanche Restoration Finished / Saddle, Brakes, Pedals & Kick-Stand

Hello and Welcome,
First I would like to mention that there is now a Face-Book page for this blog. It is called, strangely enough "Hugh's Bicycle Blog". I think it will be good for you to have a place to post your bicycle projects. Also if you have a question, a close-up picture might make it easier for myself or other readers to give you a correct answer or accurate instructions. And you can also use it to show-off your finished projects or new bikes. And I am hoping it will be a place where we can share our ideas and knowledge. There is a logo "Hughs Bicycle Blog on FaceBook" in the right column just click on it and your there.
ABOVE: I went with the "Tempo z1 Saddle" It is both comfortable and affordable. I also recommend the "WTB Speed V Comp" Saddle and the "Charge Spoon" Saddle. And I
just (today) installed my first Ze'Fal Saddle. (I will talk more about that latter)
Above: I re-used the Shimano SLR controls. I say controls because they are shifter and brake lever units. The shifters are the two-lever click-up & click down type. I like these a lot, but they do take up a lot of space on the bars. So when making the switch from flat-bar to risers or touring bars you need to measure for that. I did not measure and ended-up having to use a salvaged set of handlebars off a parts bike. I`m ok with the fit and feel, but I would have preferred black.
Above: I replaced all the cables with new Jag-Wire. By the way, I did find out the bulk cables I purchase at my LBS from time to time are also Jag-Wire. As For the grips I was going to use the gray and black Avenir ergo grips that I have been using a lot lately. However I would have had to chop them off a little. I did not want to do that with the ergo design. It would have been noticeable. So I installed the "Trumpet shaped" grips that I salvaged off the Schwinn Hurricane.

Above: As for the front brake, I replaced the shoes with a low mileage used set I had laying around. (for now). I cleaned-up the straddle cable with Mother`s Mag and Aluminum Polish. I removed the little coin shaped splitter piece and cleaned it up with the power wheel-brush (fine brass). And as I mentioned I also replaced the main brake cable with a new J-W Cable.
Above: The rear brake is a Shimano U II. It is incredible! It has no springs, (unless they are internal). And after assembling and mounting the brake on the bike it had all most no return pressure. Purely by luck,I managed to get them working correctly, here is how that happened. I thought the shoes I had installed were too fat. (which they were) So I replaced them with a narrower shoe. My thinking was maybe the brake was already opened up past the limit. So I switched the shoes. But while I was doing this I decided to snug-up the mounting post-bolts. While doing this I closed the right caliper arm by hand. It was like cocking a gun. Now I had plenty of return pressure. What I "think" this is, is a type of cam system (like a compound bow) And when I closed the arms it loaded or set the mechanism. If you are familiar with this system, Please share your knowledge via the comment section or on the FaceBook page. I would appreciate it very much.
UPDATE: Special Thanks to John Romeo Alpha for posting the Shimano U II Brake info on the FaceBook page.
Above: It turns out "although well hidden" the U-Brake does indeed have springs. Thanks John for clearing up the mystery.

Above: I installed a new set of Avenir dual-sport pedals with old style "traps and straps" (toe clips). Avenir I believe is Raleigh`s accessory company. If I`m wrong, I`m sure I`ll hear about it. I like the old style toe clips because that is what I am comfortable with. One of my brothers said, He would not buy toe-clips that required he purchase a matching shoe. It must run in the family.
Above: This bike was never intended to have a kick-stand. But being it is now set-up more like a hybrid, and almost no one around here has a freak`n bike rack.
Well you get the idea. The top plate interfered with the cable to the front derailleur so much so that the derailleur would not shift properly. So I tried to move the kick-stand back behind the brace. Well the top mounting plate is not wide enough for the stand to be stable. And if tightened down it might damage the chain stays, so that was out of the question. So I placed the top-plate in place and marked it where it made contact with the cable. Then I cut a channel "on an angle" as the cable runs through there on an angle. This way I did not weaken the plate by making the cut full depth all the way through the top-plate. So far it seems to be working fine. And the shifter cable is unobstructed and functioning fine. I also cut some rubber inner-tube and used Permatex to adhere it to the mounting plates to protect the chain stays. This is the same hardening Permatex I have used to adhere the cork grips to handlebars on past restorations.

Above: Here it is pretty much finished except for a few bolt heads that need to be cleaned-up. And I accidentally messed up a little of the touch-up on the top-tube by placing it back in the work stand too soon. And I have a little polishing and paint cleaningto do. But that's all normal finish stuff.
Above: A front left view of the bike. The white paint on the Rock Shox fork is different than the white paint on the frame. I credit my wife for picking out an exact match, not only for the frame white but the suspension fork white as well.

Above: View from the right side rear of the bike. Opps! I meant Starboard side.
Well that`s all there is for now. My next post will be about, How to spruce up your old mountain bike the Ze'Fal way! Without breaking the bank. And an update on the GIANT Attraction. Until Next Time Please RIDE SAFE & Remember to Always RESCUE, RESTORE & RECYCLE
Cheers!

Wednesday, September 21, 2011

GT Avalanche Restoration

Hello and Welcome,
This GT Avalanche has the legendary "triple-triangle" frame described by many as "Indestructible". It would appear the previous owner abused this bike badly. Not so much by the way it was ridden. But by leaving it outside and never having it serviced. The rear wheel was so badly bent it rubbed the frame. The rear brake-shoes had been removed. I assume they had to be removed so the bike could be  ridden home.

The Headset was an absolute nightmare. The nut over the top cup (shown below with paint removed)would not break loose. After removing the nut and spacers above the unpainted nut, I sprayed the threads with WD-40 hoping that would help. After I realized that I would probably destroy it before I could break it loose, I decided to take it to a pro and see what they could do with it it.
Above: If your wondering what you are looking at, what you see above is an inverted wedge-nut. Instead of it sliding out of the steerer when the stem bolt is loosened,the lower part is fixed. When you loosen the long stem-bolt only the inverted wedge-nut is removed. The stem fits over this. Then when the long stem-bolt is tightened the wedge expands inside the stem-collar. This of course locks the stem into place.
Above: The headset finally removed. When my old friend Joe was unable to remove the nut. He said I might have to cut if off. When I got home I left the bike clamped down on the truck rack. I decided to give it one last try. I attached a pair of Vice-Grips to the nut as tightly as I could without crushing it. I then wedged a wood hammer handle between the fork legs, near the top brace. Then I used a small bungee cord to hold the hammer handle in place. Now I was able to apply as much torque as I possibly could. When the fork turned the hammer handle pushed against my side. I gave it all I had, I felt the wrench move! My first thought was "Damn! I have stripped the bloody nut!" Much to my surprise the nut had finally broke loose.

Above: Fortunately the moisture that rusted the threads on the steerer never reached the bearings. Here is one of the bearing cartridges after cleaning and re-greasing. While they had very little grease remaining, they were in remarkably good shape considering.
Above: The headset re-assembled. That is quite a stack of threaded cups, nuts and spacers. This inverted wedge-nut quill and headset make an odd looking set-up indeed. As you can see there is going to be some extensive paint touch-up. Maybe the restoration will go smoother from here on. (Fat Chance)
Above: This is "Yours Truly" foolishly trying to re-use the original bracket bearings and cups after a real good cleaning. You would think the fact that I needed to use the power brush on the bearing cages would have convinced me the bearings were shot. Oh no, not this stubborn s.o.b. Another "what the Hell was I thinking" moment. And by the way. It took a couple hours to take the crank apart.
The left side arm retainer bolt was rusted into the threads. After trying everything I could think of, it finally broke loose. There was absolutely not a trace of grease remaining on the bearings. Only lots of rust and dust. Fortunately I did have a good set of cups and bearings that were an excellent match. I did have to re-use the bracket(axle) itself as I could not find a match. But it was in "pretty fair" shape. After re-assembling the bottom bracket the second time, everything was "good to go". I think on a scale "one to ten" the performance of the crank now is about a 9.5 or so.

Above: The three piece crank was taken apart and cleaned-up. No problems there, other than spending quite some time on the floor looking for one of the spacers.
So far I have spent way too much time on the bottom-bracket, crank and the headset.
Lesson here "Don`t leave your bike outside to fend for itself".
Above: I`m gonna guess and say this is the left side chain-stay. As you can see it has some nicks in the paint which have become rust spots. The first step is to clean the area as best as you can.

Above: The next step is to sand off the rust. QUICK TIP: I like to fold the sand paper. This way I can use the folded edge to sand just the nick. If it is rusty, I will first use a grittier sand paper then finish with a finer one. If it is not rusty I will often just use the finer sand paper. Folding the sand-paper is the best way I have found of just sanding the nick.
Remember, This is a touch-up, not a re-paint "Less Is Better"
Above: After the sanding is finished you will want to remove all the dust. On this occasion I used a damp cleaning wipe, then dried it with a clean paper towel. It would finish drying while I was shaking up the paint.

Above: Applying the lacquer to the nick. Do Not Brush! What you want to do with a paint chip like this one is just tap the nick with the end of the brush. Make sure you shake the paint up real good, and repeat often while working with it. You want to make sure you don`t over-load the brush with paint. This will take a little practice. If you screw-up, just wipe it off and try again.
Above: The same area after paint touch-up. The best advise I can offer for doing touch-up is take your time and be patient. The touch-up on this frame was extensive.
This was one of the better areas. All the touch-up really tested my patience. As did the whole restoration.
Due to the rear wheel being bent beyond proper repair, I decided to use the wheel-set off the Giant Boulder that came in recently. At this point I `m not sure what I want to do with the Giant.

Above: The Araya wheel-set cleaned up easily with some Mother`s Mag and Aluminum Polish. The wheels required very little truing and the hubs and spokes cleaned up easily as well. I topped them off with a new set of Kenda Kross Plus 26 x 1.95 "Smooth Rollers" as I like to call them.
Above: A shot of the rear wheel, derailleur and new chain. I was able to re-use both derailleurs. After a good cleaning and lube, both are working flawlessly. Being both bikes were equipped with essentially the same rear drive train, there was no need to switch the free-wheels. I knew eventually something would be easy on this bike! Hip! Hip!...never mind

Above; These are the new handlebars I was going to use. But after test fitting the lever/shifter units, I found there was not enough room. I will no doubt use them on some project down the road.

Above: I taped off the top part of the original seat-post. And after a light sanding gave it a coat of black satin.
Above: A shot of the Shimano front derailleur re-mounted after a good cleaning and lube.
That about does it for today. I will try to post the rest of the restoration in the next few days. It will include some last minute changes. And I will be giving this GT the full Ze-Fal treatment. Including some really cool new Ze-Fal products.(new around here anyway) Until Next Time, RIDE SAFE and Remember to always RESCUE, RESTORE & RECYCLE
Cheers, Hugh

Wednesday, September 14, 2011

Brittany 3 Speed Resoration Part 3 / Paint, Wheels, Brakes and Other Things as Well

Before I get started I wanted to mention that Hugh`s Bicycle Blog now has a FaceBook page. I think this will be an asset, as readers will now have a place to post their projects. And I hope it will be a place where we can exchange ideas and answer questions. The link is posted right at the top of what was once called the "Bicycle Related Links" section. For now it is called "Hugh`s Bicycle Blog on FaceBook and other Links". Please check it out and please click on LIKE to show your support.

Left Click on Images to Enlarge & Focus. Use Back(<)Button to Return Above: The front wheel cleaned-up quite nicely. I used the Turtle-Wax Chrome Polish & Rust Remover and also a brass detail brush. I also did the sides of the rims (braking surface) with the wheel brush. As for the fenders and the rest of the painted surfaces, after everything got wiped down with Armor-All Cleaning-Wipes I used Maguiare`s Cleaner/Polish. I do not usually get off this easy. But underneath the dirt and grime the paint was in wonderful condition.


Above: The rear wheel was not so easy, evidently it was in a much damper area. That may sound funny, but I see it a lot. One wheel much rustier than the other. I imagine the rear wheel was nearer a door. This pic shows two things. First, how much pitting was left behind after brushing. And second, how much rustier the bottom (the area closest to the floor) of the wheel is. If you look t the right of the brushed area you can see the rust was much less severe. If you were doing a "show bike" you would want to replace it. But this is just a fun-bike that won`t cost a fortune when finished, and will still look really good.
Above: The front caliper on the left "Barn Fresh" as they say. And on the right ,the rear caliper after dismantling and polishing each part. The chrome parts were cleaned with the wheel-brush mounted on the rechargeable drill. And "as always" the rear caliper got a new pair of Jag-Wire brake shoes. Also "as always" I only took apart one caliper at a time. This is so I could use the other caliper as a reference. These two calipers had lots of spacers/washers. So I was glad I did it that way.

Above: I decided to go with a more aggressive KENDA tire on this bike. I know that many students ride pretty much year round. And with the winters we have here, a little extra traction will come in handy. I thought I had a set of tires for this bike
in stock, but the tires ISO number was wrong. These are I believe a 26 x 1-3/8inch tire with a 590 ISO. I believe the tires I have in stock are a 597 ISO. So watch those ISO numbers especially with Old 3 speeds.
Above: Here is the other "first time used" product I installed. The first being the Kenda tires with the aggressive tread. I also installed a BELL handlebar-mounted water-bottle cage. I must admit when I first saw these, I though they looked stupid. But as my water bottles always seem to get all gritty from road spray. It occurred to me one day that having the cage mounted up high would keep the bottle much cleaner. Ok, So now I`m sold. They are not stupid. I don`t know that I would want one mounted up there on a Road Racer. That I think "might" look stupid.

Above: The finished project. I think the real cork grips give it a vintage look.
I Shellacked them to protect them from the weather. I used the Permatex (hardening)
gasket sealer to keep them securely in place. I smeared some sealer inside the grips then slid them on. You will want too wear a plastic glove for that part.
Above: The Port side view of the Brittany. I was surprised the rack cleaned-up as nicely as it did. It was much rustier than the rack on the step-through Brittany.
It was labor intensive brushing the rack, but well worth the effort.

Well that about covers it for this project. I would like to apologize for the delay in showing the finish pics of the "Parliament Custom Built Made in England". I am not 100% pleased with the paint touch-up color match . But here it is just before I re-installed the original rear wheel (shown in foreground)
Above:  The unfinished Parliament. Until Next Time RIDE SAFE and Remember to Always RESCUE, RESTORE & RECYCLE
Cheers, Hugh

Saturday, September 10, 2011

Brittany 3 Speed Restoraton Part 2 Saddle Hardware Rust Removal

Hello and Welcome,
I think I will pick-up on this restoration with the saddle. I don`t really spend much time talking about saddles. I suppose this is because I usually replace them.
I often find these adult bikes that were purchased with good intentions. Then ridden a few times, only to spend the next 25 to 30 years in the garage or basement. Many of these bikes have very good saddles that just need some intense cleaning.
However the touring saddles with chrome springs and rails usually require some serious attention. That is before they are going to look like the original 1984 saddle shown above.
Above: This is the underside of the saddle shown above. To really do the best job possible with rust removal I will have to remove all the chrome-plated hardware for rust-removal. I like to start with the seat-post clamp. Start by by removing the nut (A) and sliding the tightening bolt out the other side. Note:
Most will have a nut on both sides.(like the example used below) In which case remove both. After the tightening bolt is removed the whole thing can be pulled out.(it should fall apart)

Above: A similar seat-post clamp after each part has been brushed. Be careful cleaning small parts with a power brush. This is where a low speed drill will serve you better for brass wheel-brushing. You may want to clamp onto the smaller pieces with pliers to save your finger tips. I like to thread the nuts onto the tightening bolt for easier wheel brushing. Just make sure you run your drill in the direction that will tighten the nut and not loosen it when the spinning brush makes contact.

Above:
To remove the coil springs for brushing I removed screws (B) & (C) This will also remove the spreader/brace (E) I just set that aside for now. There is also a nut and washer on the top of each coil that attaches them to the seat pan.(see below)
Below: This pic shows me tightening the coil, it comes off the same way. I used a small 1/4" nut-driver for this. The outer coils clean up easily with a brass wheel-brush. As shown above I clean the unreachable inner spring with a small folded piece of automotive grade sandpaper.
Once the coil-springs are removed and cleaned-up, to remove the rails just remove nut (D). The rails and spreader / brace are easy to clean using the brass wheel-brush. You may also want to use the folded sand paper and a detail brush on the hard to reach spots.

Above: You can see the spreader / brace cleaned up and a wee bit of the rail piece as well. In this pic I am about to set the nut into place to re-attach the coil spring to the pan. If you look closely you can see the washer has already been placed onto the threaded post. After setting the nut I carefully tighten it with an open-end wrench. This takes a very steady hand. An easier way might be to stick a small piece of double-sticky tape on the nut, then place it into a socket.
Then with the nut-driver you should be able to start the nut by hand. Once started
you can use the small ratchet or a small wrench. I wish I had thought of that when I was putting it together. I am sure it would be much easier. Or if you want to "get all scientific" you could magnetize the socket.
Once the coils springs are attached to the seat pan, You have finished the hard part. The rest of the assembly should me fairly simple. Above: The hardware all back in place and looking "pretty good". You will want to clean-up the seat pan when you have all the hardware removed as well.

Above: A shot of the underside of the saddle after it has been remounted to the seat-post. I only mention this because I saw one mounted backwards recently. When you re-install the seat-post clamp the main tightening-bolt should be on the backside of the seat-post. If it is on the forward side of the post the seat-post clamp is backwards.
Above: I know I said I was not going to spend much time talking about the crank and bottom bracket. I lied < lol > I just wanted to mention this "again". The drive side of the bracket is longer than the left side. Sometimes the difference is minimal. So if they look the same, you might want to check them just to be safe. Shown above is the left side.

Above: Here is the drive side. The difference is less than it appears as the tool is a little off the lip. Hey, I was holding the camera in my other hand. But I think you get the idea. Better to "check twice and build once"
Well that about does it for me today. The sun just came out and I have work to do.
Part 3 will be about cleaning / polishing paint. I also want to talk about wheels and pitting (rust) And a first time installation of a product I have never used before. Until next time RIDE SAFE and Remember to Always...RESCUE, RESTORE & RECYCLE
Cheers, Hugh

P.S. Look closely at the first pic of the underside of the saddle. Notice the brace/spreader is mounted between the coil-spring and the rail piece. Now look at the finished pic. I have installed the brace/spreader last or on top of the rail-piece. I don`t know if it matters (I`m not an engineer) but I`m going to correct it anyway. This is a perfect example of how a digital photograph can assist you in proper re-assembly.
 
Cycling Blog Directory