Saturday, September 25, 2010

Raleigh (USA) Record Rehab

Click on Image to Enlarge. Back-Button to Return

I found this Raleigh Record (USA) recently at a local Thrift Store. I was disappointed to see they had it priced way too high. After showing the manager it had two badly bent wheels, we negotiated. After agreeing on a "fair" price I loaded it up and brought it home.

Above: I did make a futile attempt to true the wheels. After admitting defeat I decided I would part-out the Fuji mixte you see in the background. There are a couple of reasons I decided to do this. First the obvious, I need two straight decent quality alloy wheels. Also the Fuji was cheap and I need the crank, stem and the rear derailleur for another project. And finally I am already sitting on one mixte. And I know this Raleigh will sell quickly and bring a good price. And the mixte? Who knows.
Above: I planned to replace the jockey-wheels with a matching set off a salvaged derailleur. Only one problem with that plan, One of the little axle-bolts will not budge. And I mean stuck to the point where the head rounded off (with the proper wrench) before it would break-loose. Ok, looks like the rear derailleur off the Fuji just got re-assigned. You ever get the feeling it`s gonna be one of those days?
Above: Ok, Not the derailleur I wanted to use. But hey, it`s the same basic design and the same brand (Sun-Tour). And it sure cleaned-up nice, and with very little
effort I might add. I really like the clear cable housings on this bike. And being they are in excellent condition, I decided to re-use them.
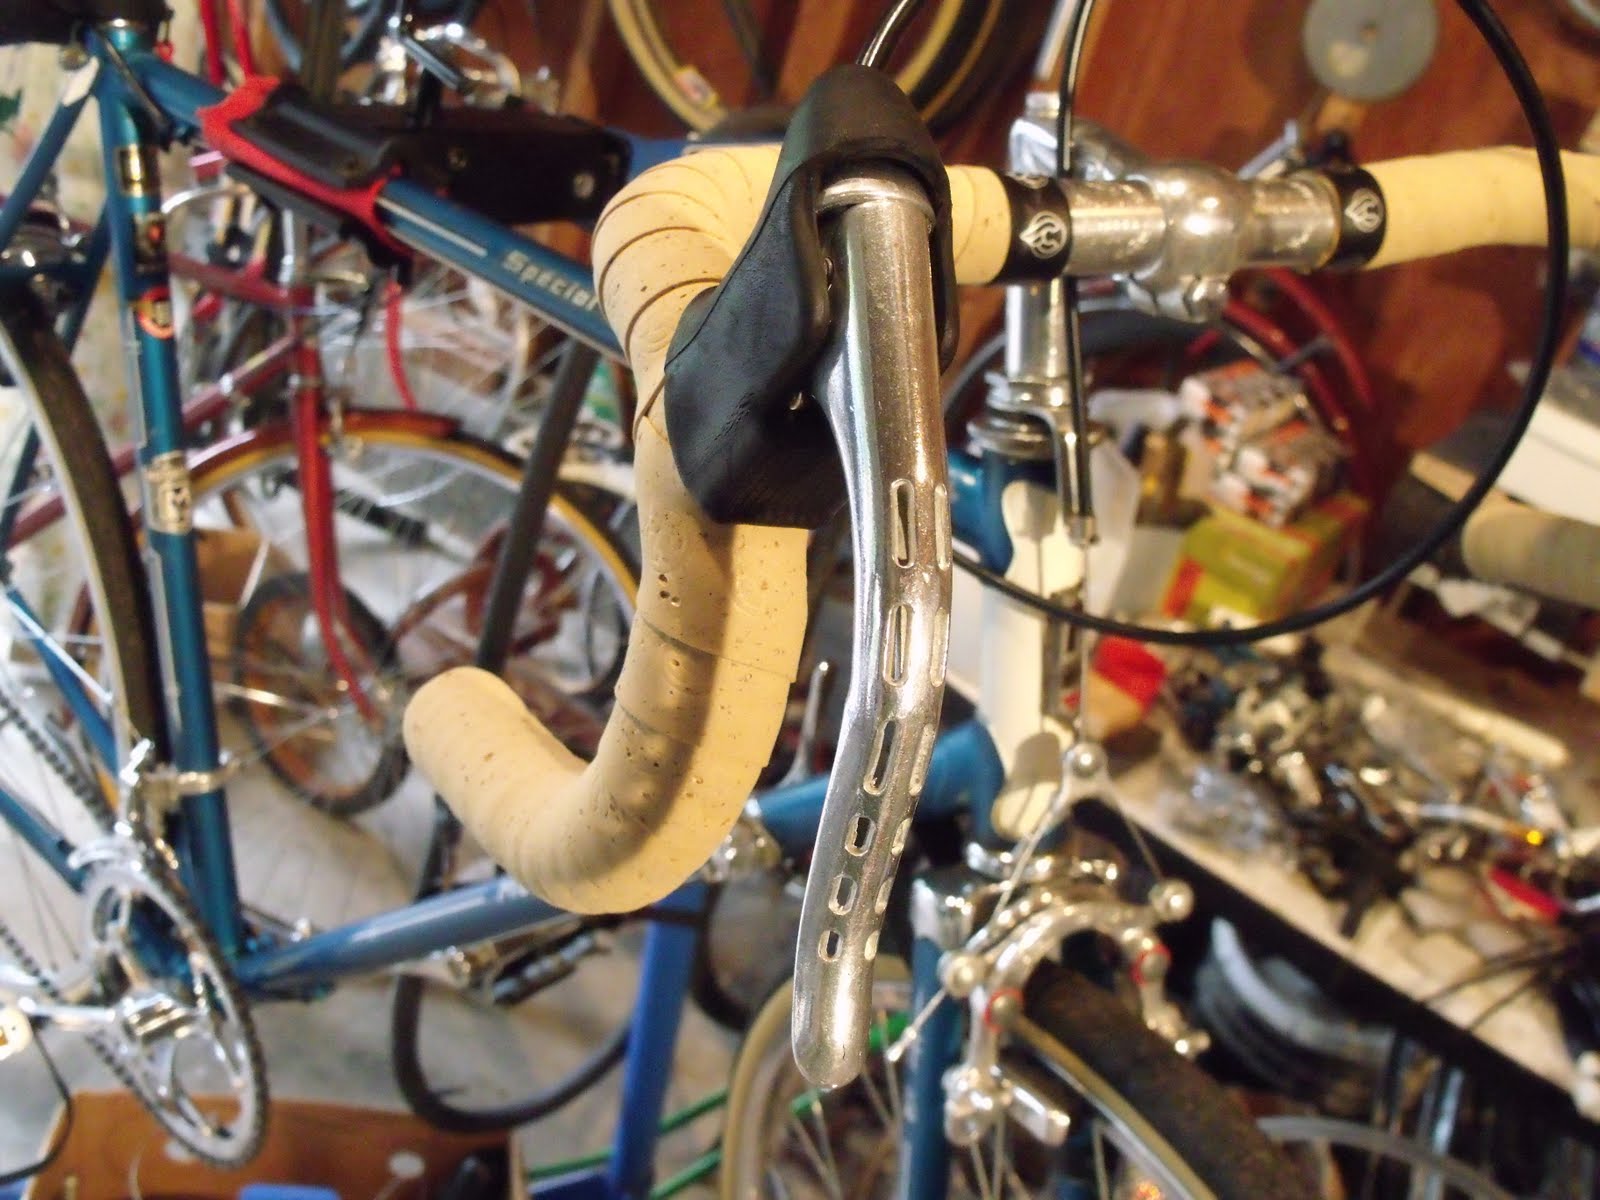
Above: I used a set of drilled Dia Compe levers I had laying around. I did cut-off the suicide levers. And I did have to re-use the post mount screws (after shortening them up a bit first). As it turns out, this time there was too much play in the lever housing or frame. And with out the post screws I was able to push one of the posts hard enough for it to come apart. So I was WRONG to assume it was not necessary to re-use the post mount screws.(from the suicide levers)
As it was "clearly necessary" in this case. So here it is "I WAS WRONG"
And the Truth shall Set You Free (:
Above: A nice shot of the levers. You may notice there are no cables. I ran all the housing to make sure they were all there, and all in excellent condition. And it gave me a chance to see how they look. Also I added my favorite (and last of my stock) Charge Spoon Saddle. I hope I am able to locate some more of those some day. The Dia-Compe side-pull calipers cleaned up nicely and they also got some fresh Jag-Wire shoes.

Above: Can anyone guess why this is not the same front derailleur you see in pic # 5 Here is a clue. It is not because it was not functioning properly. As far as I can tell they both work fine. So what was the "mix-up" Why did I have to make the switch?
Above: The Raleigh Record finished-off with Cinelli natural colored cork infused tape. For the pedals I went with the Wellgo LU961 ( vintage shimano v 105 knock-offs) I just spotted a set on the bay for under 20.00
Above: I love the engraved handlebars and the classic looking Raleigh head-badge.
There`s is just something classy looking about a Raleigh. Even though it is not a Nottingham Raleigh, it still has that look. I don`t know if I should ride it or salute it!
Well that`s all I have for now. The next post will be about the other Raleigh USA. Which was the recipient of some of the other donor parts from the Fuji. And a few parts from the cannibalized woman`s Raleigh. And dressed up with some take-off accessories from other projects. Till Next Time, Please Ride Safe and remember to always RESCUE, RESTORE & RECYCLE
Cheers,Hugh

Sunday, September 19, 2010

My MotoBecane "Special Sport" Part 2

Left Click on Image to Enlarge, Back-Button (<) to Return


Above: The original pedals almost got thrown-out. Once I realized the pedals have the old "French-Thread" I was glad I had kept them around. I spent about 4 hours on the pedals with Turtle-Wax Chrome Cleaner/Polish and Mothers Mag and Aluminum Polish. I also used brass brushes and a brass power-brush (3/8 drill attachment). Once they were cleaned-up I installed new reflectors to give them a fresher look. I also ordered a set of retro looking traps and straps. Over-all I am very pleased with how the pedals came out.


Above; The original Stem looked a little suspect. And after reading-up on the subject. I found out that, it not only looks crappy, it actually is. Sheldon Brown
has an excellent post about old French bikes and size problems you may encounter.
(I will add that to the links right away) Turns out the Stem is also an odd old French size. I was able to sand-down (by hand) an old GB stem that I think came off an old Raleigh Record. It looks 100% better and I don`t have to worry about the original one failing. As I have since learned that they have been known to do.


Above: The GB Stem sanded down to size and polished and installed. Note: When sanding down a stem wrap the sand paper around the stem and grip it tightly and turn the stem inside the paper. This will allow you to make a nice neat stopping point as compared to sanding up and down.


Above: The SAKAE "Road Champion" bars I borrowed off an upcoming project (1980 Schwinn Continental). I have always been fond of the ornate engraving on the Road-Champion bars. And since I was building this bike for myself, what the heck Go for it! The levers (un-marked) are off a French Canadian (Pacer) bike. They seemed to fit in with my international theme. And I think they look pretty damn nice. And their "free-ness" more than makes up for any thing they may be lacking visually (:


Above: My choice for the saddle is the Charge Spoon Saddle in brown. I think it goes good with the natural colored Cinelli tape and the PanaRacer 105 psi (27X1&1/8) Gum-Walls. I also think it is the most "bang for the buck" at less then 30.00 (online)


Above: Starboard-Side view of the finished project.


Above: I`m not one to waste an un-used mounting bracket. So I modified a reflector mounting bracket and used this Schwinn rear fender reflector. I think it looks pretty cool. I`m thinking the bracket on the stay was for a rear light or a sliding spoke lock. At any rate, now it is for my rear reflector (:


Above: I replaced the bulky fork mounted generator and light with this much simpler (and considerably lighter) white front facing reflector.

Well that`s all there is for today. I would like to say that, I really enjoy riding this bike. It rolls great and fits like a glove. It also Shifts smoothly and is very quiet. I think I have finally replaced my beloved Fuji Gran-Tour SE. Till next time RIDE SAFE and remember to always RESCUE,RESTORE & RECYCLE
Cheers,Hugh

Thursday, September 16, 2010

My MotoBecane "Special Sport" Part 1

Left Click on Image to Enlarge, Back Button (<) to Return


Above: I got a call from one of my "pickers" Cal a few months ago.
The conversation went something like this. "Hugh, I have a bike I think you might be interested in. It`s a Moto something". Talk about "getting my attention." I thanked him and we set a day and time to meet at his place. Strangely enough Cal lives on the same street as one of my oldest childhood friends. About 25 miles from here.


Above: This is how I found the bike. My first thought was to restore it "as is" a practical commuter bike. But after checking the dimensions and realizing it would be a perfect fit for me. And not being real keen on commuter bikes (for myself) I decided to go with something more basic.


Above: I love many things about this bike, But these "MAFAC RACER" Brakes are fantastic. At first I thought, where am I going to find these straddle cables?
Then I realized that they are just shifter cables. When I buy universal shift cables and use the disc shaped end (on some old Schwinns) I always save the left-over short end to use for a front derailleur cable. So basically they were free (:


The Motobecane`s original wheels are chrome plated and have the dimpled sides, that make the brakes sound like an electric motor when applied. Also they are quite heavy. And the rear hub made a loud clacking sound. I purchased a woman`s Raleigh "Persuit" at a church/garage sale for the Belguim made alloy wheels (above) and some of the other components for 30.00. These wheels are a huge improvement, that did not cost a lot of money. Of course they did need polishing and truing and some fresh grease. Some of the other components went into my next project, A Raleigh Record


Above: The original crank while a bit heavy, it is straight and smooth. When I took it apart, to remove the bracket for cleaning and grease. One of the cotter-keys gave me fits. At one point it (threaded end) folded over (bent) and I thought Oh great! This bugger is never gonna come out. But I cut it off smooth and braced it using an old steel seat post (to absorb the shock) and managed (after several hits) to punch it out using an old nail-set. Not a method I would recommend. A little tricky, bike mounted on the stand then lowered to the correct height to slip the steel post over the fat end of the key. the holding the post and punch steady with one hand and swinging the hammer with the other. Great Fun...lol. I trimmed the threaded end of the key flush with the nut for a cleaner look. I did this using a cutting wheel on my 3/8 (plug-in) drill.


Above: I did decide to replace the original derailleurs with some more modern and reliable SunTour derailleurs. I did however re-use the original shifters. Not like I had a choice, as they are mounted to a brazed on post (on one side) to the down-tube. But they look and work fine, no worries there.
There is much more I want to talk about with this project. So I will do a Part 2 Soon. In the mean time Ride-Safe and remember to always RESCUE,RESTORE & RECYCLE
Cheers, Hugh

Thursday, September 9, 2010

Schwinn World Tourist

Left Click on Image to Enlarge. Back Button (<) to Return

Above: I recently finished this Schwinn World Tourist. It has a "Giant" built lugged frame. It was a little rough when I found it. The original rear fender had a home-made rear strut on one side. While it did function well, it looked a little rough. Fortunately I had a copper colored fender set left over from an old conversion (commuter to racer). This bike is kind of odd. It has a front FF Crank set with a rear 6 speed freewheel sprocket group. And a Normal friction rear derailleur. Not the hard-wire cable operated positron derailleur you would expect. Kind of a mixed bag for sure. Oddly enough it seems to work fine.
Above: You might recognize the Avanti rear bicycle rack. It was on the Fuji S10S that I restored not too long ago. The rack did not fit into the plans I had for the Fuji. But it sure looks "right at home" on this classic style commuter bike.
Above: This is the Brooks touring saddle removed from the Ivory colored Raleigh Sprite. Why would I take the Brooks saddle off the Sprite? What happened is this. Another old Raleigh came in. Kind of rough, but sporting a brown Brooks leather touring saddle circa 1973. After cleaning-up the rails and springs and Saddle-Soap cleaning the leather four times. And then after a good buffing, I put it on the Sprite. (also circa 1973) It was a match made in heaven. It was what the Sprite lacked evidently, as it sold quickly after I made the switch.
Above: The rust on the front derailleur was bad and was even worse on the rear. Because I had two almost identical derailleurs on hand, I decided to replace them. I will clean-up the originals and use them on some latter project or repair. Unfortunately I was unable to save the rear wheel. I did "true it up" but there were some severe curb dents that I was unable to hammer-out properly. This is the part when I was glad it had the weird set-up. A 27 inch rear wheel with the five speed fixed set up would have been much tougher to locate. That`s how a normal FF front free-wheel works. The rear gears are fixed and the crank free wheels. Pretty amazing the first time you see one. So I just borrowed a matching rear wheel from a Schwinn Varsity.(future project) I did however swap the free-wheels.
Above: I was able to save the original touring handlebars using Turtle Wax Chrome Polish & Rust Remover and a brass detail brush. You may notice the handlebar chrome is not the best, but it is acceptable. I love the old style Schwinn grips. Always nice to find those in great shape.
Above: I added a new Schwinn water bottle cage and new Schwinn alloy quill pedals and also a new Schwinn chain. It also got all new Jag Wire Basics cables and Jag wire X Caliper brake shoes. The brake calipers were removed and polished. The threaded headset was re-built and the front free-wheel bearings were lubed. And the frame and fenders were cleaned up as well.
above: Due to different mount-hole positions (from the original) This fender had to be extended in the front. I used part of the original fender to make the extension. The result was a very custom looking wrap around fender. I also replaced the tombstone tail reflector with a more retro looking round reflector. Then I mounted the same type reflector to the rack. I rode this bike into town for coffee with friends Tuesday. It performed flawlessly. However being a couple of sizes too small for me my upper legs got an awesome (and painful) work-out.
Before I close I would like to thank Everett K for letting me post his road-bike project on my blog. I have never blogged about someone else`s project before "and it showed". I found myself answering comments that I should have let Everett answer. I apologize for that, I was treading on new ground. I will not repeat that mistake in the future. So sorry pal, I screwed up. I will try to delete my response (if I can) and post Everett`s response if and when I receive them. Till Next Time, Ride Safe :) and remember to always RESCUE,RESTORE & RECYCLE
Cheers,Hugh
ATTENTION AMAZON SHOPPERS!! You can help Support This Blog by simply logging onto Amazon dot com using the Amazon Search Box located at the Top Right Corner of This Page. It will not effect your cost and I will receive a small commission. Thanks for your support, Hugh

Wednesday, September 1, 2010

Everett K`s Classic Road Bike Restoration

Every once in a while I hear from a reader about how this blog was helpful in some way to his or her bicycle project. And I gotta tell you honestly "It really makes my day" After all, That is what this blog is all about. Also a sincere "Thanks" to those of you who have left comments and sent e-mails. I have learned a lot from your feedback.
Left click on pic to enlarge. Back Button (<) to Return

Above is Everett K`s classic road bike restoration. Everett`s dad purchased the frame in the 1970`s while stationed in Holland. After returning to the USA he rode it occasionally and eventually stored it for 10+ years.
Everett tells me originally the top tube decal read "Mondial Campagnolo" which would indicate it is a Gazelle.(A bike I know absolutely nothing about) Everett says it looks like a Raleigh, I tend to agree with that. After storing the bike for 10 years Everett`s dad gave it to him as a gift. Everett rode it "as is" for a year before he decided it was time for a major over-haul. And as you can see it came out quite nicely.
Above: I recognize that "Mothers" shine on the brake caliper. The paint, which I believe Everett had done professionally looks fantastic. Check-out those Schwinn Bar-cons (bar-end shifters) It may sound funny "Schwinn" shifters on a classic road bike. But it is actually very correct, As they were considered top-notch in their day.(because they were)
I see a few of my favorite upgrades there. A micro-adjust seat post is always a nice upgrade that doesn`t break the bank. And Aero levers. The Tek-Tro levers offer a wide hand rest which I find very comfortable. Nice choice there for sure.
Also very reasonably priced. Nice job routing that front brake cable too!
Here are some of the other components used. The pedals are Shimano 600`s. Sun-Tour
cassette. Campagnolo front derailleur, Zeus Criterium rear derailleur. The 54/45 Sugino crank set has been replaced with a 53/39 Campagnolo Veloce C.S. Campy Record Ace Hubs w Campy quick release skewer (Zeus Q.R. on rear) Nice job on the handlebar tape. There is a lot going on there with the levers, barcons and cable coming out of the handlebar. Also I like the modern brake shoes on the classic Weinmann center-pull brakes. Nice mix of the old and the new. (well newer anyway) Congratulations Everett on a job well done.And thanks for sharing it with us. Maybe one day you can pass this bike on to your son or daughter.
 
Cycling Blog Directory