Tuesday, June 23, 2009

Fuji Restoration Continues


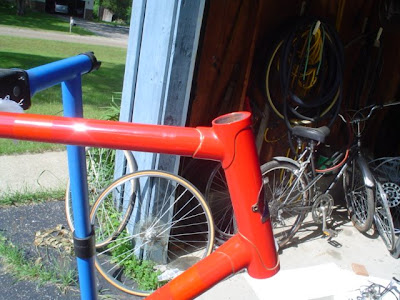
Wow! where do I start? Today went well. First the wheels and hubs. I trued the rear wheel on the truing stand. Then I cleaned up the free-wheel with White Lightning Clean Streak and sprayed some Tri-Flo on it. Also greased the axle bearings and cleaned up the hub and spokes and pie plate. Then I polished the rim with some "Mothers Mag & Aluminum Polish. Next the front wheel. First I trued it up, not a real big deal. It was already pretty straight. Then cleaned up the hub and greased the axle or hub bearings. Also cleaned up the spokes and polished the rim with "Mothers" When I polished the drop handlebars I used Turtle Wax Chrome Polish & Rust Remover. After that I removed the hoods from the brake levers and cleaned them (the hoods) again. This time with Permatex Hand Cleaner. I also use it to clean up gum walls when I get my greasy hand prints all over them. Since I had the hoods off the brake levers I went ahead and polished the brake levers with Mothers as well. I also cleaned up the lever mounted mirror on the front (left) brake lever. Ten I mounted the handlebars and then the levers (with the gum hoods in place). NOTE: Normally I would scrap an after market mirror. But this one is really nice, So I`m thinking I might include it in the restoration. Now for the shifters. I cleaned them up with some "Mothers" and re-mounted them on the down-tube. NOTE: The original owner did tell me that the bike originally had stem mount shifters. But if you consider the riding position of a road-racer. It really makes more sense to have them mounted on the down tube. So this was a plus for me when I was considering buying this bike. Ok! I almost forgot the pedals with the "old school" Christophe toe clips and straps. The pedals are heavy, but they are original to the bike. And they are in very good condition. Just needed some chrome polish and some fine brass wheel brushing. So I cleaned them up and put the leather toe straps back on. So I`m going to reuse them, for now anyway. So maybe tomorrow I will route all the cables.(brake and shifter) I already have the handlebar cork tape, so I can do that as well. And I guess I can install the new brake shoes too! And I do have the rim strips in stock. So I can install them as well. And I might drill out the valve stem holes in the rims (just a little) they are a little too tight. I will be tempted to put the used tires back on the bike. And borrow a saddle off another bike. Hell, I could be riding this bike tomorrow! We`ll see.
Ride Safe and remember to RESCUE-RESTORE and RECYCLE! Cheers,Hugh
Monday, June 22, 2009

Fuji "Gran Tourer" Restoration


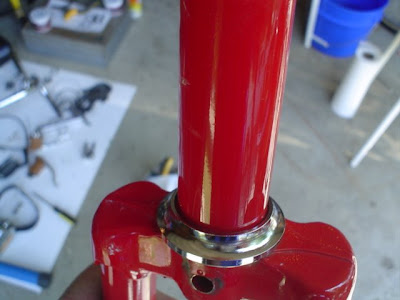
Today I worked on the Fuji "Gran Tourer" restoration.Here is a little tip for rebuilding threaded headsets. When you remove the threaded headset including the (races and bearings) you can wrap a wire or zip tie around the top race, cup and cartridge bearing. That way you won`t mix them up. And I have found that a little "Mothers" works great on cleaning the crown race on the top of the fork (see pic). And of course you want to inspect the bearings, cups and races. As you can see the ones from this Fuji are in excellent condition. I remove the head tube bearing cups with a long and large slotted screwdriver. (not the correct tool) I like to remove the bottom one first. This makes it a little easier to get a good angle with the screw driver when removing the top head tube bearing cup. You want to tap the cup out as evenly as you can. So don`t strike to hard. So I don`t get carried away, I prefer a lighter hammer. And I use a piece of wood when tapping the bearing cups back into the head tube. (also not the correct tool) I use a 4in x 4in square piece of 1x Or 2x works just as well. You want to make sure you have the cup positioned level and then place the wood over the cup. I like to give it a good strike tapping does not work so well for me when replacing the bearing cups. Well now that the bearing cups are back in place you are ready to apply a light coat of grease to the cups (as well as the crown race). Then grease the lower bearing and place it on the crown race. You want to make sure it is in the same position it was in when you took it apart. If you are not sure, take the well greased bearing (by it self) and place it in position on the lower head tube bearing cup (which is already coated with grease and once you have it in place turn it back and forth inside the bearing cup. If it does not feel smooth try flipping it over. The side of the cartridge bearing that exposes the individual bearings should always be facing into the bearing cup. So the bottom bearings would face up and the top bearing would face down. Ok now you have the top headset bearings in place and the bottom headset bearing in place on the crown race (facing up).You are ready to put the fork back in place. As you slide the Steerer Tube through the head tube. Go easy so you don`t push the top bearing out of place. Once you have it inserted, thread the top "threaded-race" into position. An old rule of thumb is tighten it (by hand) till you feel the bearings grind when you turn it. then back it off (just a little) and it should now feel smooth. Now if it feels right you can put the spacers or washers in place then the lock-nut. Now you have finished the head-set rebuild. Note It is always better to use the proper tools. You can purchase a headset cup removal tool. And they also make a headset press for installing the cups. If you would like more detailed (and much better) instructions go to www.parktool.com then click on repair help. Then just follow the directions carefully. It is a great resource for the home bike mechanic. And they make the correct tools for removing and re-installing the head tube races. Also check-out Sheldon Brown.com probably the best home bicycle mechanic reference on the Internet. Today I ordered the tires and a new saddle and some other stuff for the restoration. I will try to mount the handlebars,and brake-levers as well as the down tube shifters tomorrow. And maybe start on the wheels. Till next time, Ride Safe and please remember to Rescue-Restore & Recycle
Cheers, Hugh

Saturday, June 20, 2009

Return of the Schwinn Suburban 10 speed


A while back I restored a Mans Schwinn Surburban 10 Speed with the Shimano FF Intiger System. When I stripped the bike I removed everything except the hard-wire shift cable to the rear derailleur. This was for two reasons. First was "fear of the unknown" and second was, it was functioning perfectly. So why go looking for trouble? Well eventually I sold the bike to a fellow named Matt. And he loved the bike (and still does). But after about week I get a call from Matt. He informs me that the wire cable to the rear derailleur has snapped! Wow! The only part I did not remove for polishing or cleaning or replacement is now broke. I tell Matt "We will have to try to locate a cable for a "Shimano Intiger FF System". As luck would have it I have been real busy the last two weeks. So I asked Matt if He could try to locate a replacement. Also asked him to measure the existing hard wire cable for a good match. Fortunately Matt was able to locate an old "but new" hard wire replacement cable. It was for a 5 speed but everything else(lever,wire,spring,cover) appeared to be a perfect match. Way To Go Matt! So we set up an approximate date for Matt to drop off the bike. It is still ride-able,(Thank God) So I have time to finish the "Boat-House from Hell" that I have been doing some maintenance work on with a friend of mine. So a few days or so latter, I get another call from Matt. It seems the back tire has blown. But it is the tube, the tire looks fine.(Thank God again). I tell him no big deal, "I have plenty of tubes laying around I`m sure I can find a good one to replace it with" (for free). Also He tells me that he has purchased some after-market chrome fenders. And that he is having trouble mounting them on the bike. And would I be interested in installing them? Well what the hell, He has been a good sport about the cable and the flat. So sure I will install them, but that I will have to charge him something for that. But the other stuff will be "no charge" So today I was finally able to work on the bike. The "Bicycle Gods" must have been watching over me, because the hard-wire cable went on without any serious problems. And the tube replacement went well. I got the tire seated on the rim real good. So hopefully no more blow-outs. Now it is time for the one size fits all touring bicycle fenders. Well I think the "Bicycle Gods" got called away..LOL. It did not go as smooth as I would have liked. Lots of fitting and cutting and a little bending.Also My garage faces west, and by about 3:30 pm it is about 150 degrees in there! OK about 95, But very humid! And the heat and the fenders were taking turns kick`n my ass. But when I finally got the fenders mounted the way I wanted them I think they looked pretty damn good. So tomorrow Matt will pick-up his bike. And hopefully I will get some work done on the Fuji Gran Tourer. And get an order in for parts and tires. But first thing in the morn I will load my MotoBecane into the back seat area of my truck. And take a leisurely ride through the park. Maybe I will see some more deer. By the way, two deer crossed the path about 25 feet in front of me this morning on my ride. Now that`s a good way to start a day! Ride Safe and remember to RESCUE-RESTORE & RECYCLE
Cheers,Hugh

Wednesday, June 17, 2009

KTM Formula 10


Hello my fellow bicycle lovers! I think I featured this touring bike on my "Bike Hunt" post.
This week the KTM is featured on oldtenspeedgallery.com This is the first KTM ever to grace the pages the gallery.(I`m very stoked about that). And definitely the first I have ever seen.The more I look at this bike,the more I love it. And I can`t help but wonder how this Austrian found it`s way to Michigan? I really like the stem mount bicycle bell, it is very cool. And the motorcycle style tool box. Not surprising for a company known for building motorcycles. And the front mounted generator with headlight and tail-light,Wow! How cool is that? This is a very practical bike. Looks like it would be great for a long distance "ride and camp" Or just a great everyday commuter bike. It has what appears to be a "lock of sorts" mounted on the rear fender stay. I`m guessing you turn the key to slide it into the wheel, making the bike un rideable. I wish I had the key so I could find out. Also touring fenders,for riding in "not so perfect" conditions. And the four (yes four) spoke mounted reflectors. Damn! Now that`s visibility! I`m thinking this is like the "Volvo of the bicycle world". Very safe and very practical. Funny thing is, I really did not think "all that much" of this bike at first. Other than that it was a brand I have never seen. And had a really cool stem-mounted bell. (also the first I have seen). But the more I have looked this bike over, the more I have come to appreciate it. Sure it does not look very exotic. And it was probably never seen in the Tour de France.(not counting spectators anyway) But Hey! "It is, What it is" And that is a very thoughtfully designed and Practical & Safe bike. And that`s a lot! Ride Safe and Remember to RESCUE-RESTORE & RECYCLE
Cheers,Hugh

Monday, June 8, 2009

Schwinn World from 5-25-09 Finished


Well I finally managed to finish the Schwinn World road bike. The parts arrived about a week ago. But I have been to exhausted to do anything with them. My other job, Journeyman Mason & Master Wheelbarrow mechanic has been keeping me busy lately. That is a rare thing these days. And I gotta tell you "It`s not as much fun as it was 30 years ago.
Enough about that, back to the bike. First thing was to mount the new 27 x 1 1/4 gum wall tires, tubes and rim strips on the wheels. Then I put the new Jag Wire brake shoes on the freshly polished and remounted side pull brake calipers. Next I installed the new 1/2 x 3/32 Chain. I decided to refurbish the original pedals. They had some surface rust and needed a good cleaning. Replacing them would have been easier. But this is supposed to be about refurbishing and recycling parts. So break-out the elbow-grease! I finished off the pedals with some new "old-style" pedal clips and straps. I did replace the saddle. The original was intact but a little rough. And I had this road bike saddle, that I decided not to use on my MotoBecane. So what the heck, put it on the Schwinn. Now it is time for some Jag Wire brake cables, and new cable housings. The original cable housings were a little rusty inside, I think the black ones look better anyway. Not to mention that I had a bunch of new cable housing left over from re-using original cable housings and just saving the new housings that came with the new Jag Wire Basic cables. That is before I started buying naked bulk Jag Wire cables. Well now I can ride it around the driveway and see how it feels. But I can`t shift because I have not installed the new derailleur cables yet. So those went on next, no problems there. I did replace those cable housings as well. Cutting them to match with a cutting disc on a high speed DeWalt keyless chuck drill. With the typical 1980's road bikes you will want to install the front derailleur cable with the front derailleur on the small chain-ring before you start. Once the old front derailleur cable is removed it's not like you are going to have a choice anyway. The front derailleur is spring loaded and will snap back to the small chain ring when you cut or loosen the cable. And when installing the rear derailleur cable you will want to place the chain on the smallest cog or gear before you start. And make sure the shifters are in the up position. (no tension position). That will make it possible to remove all the slack in the cables before securing them at their anchor points. If done properly you might not need to adjust the derailleurs at all. Now the only thing to do is install the new blue Gecko handlebar tape. I also added some blue 3M vinyl detail tape and some black over the chain stay. It is a nice way to add some color and also cover some scratches. I found it in the paint department at the local (Peter's True Value) hardware store. Now a quick damp cloth wipe down and she`s done. Although I may change a few things before it is over. I`m not sure I like how I did the blue trim on the top tube. Looking at it now, I`m thinking I should have cut it into segments to break it up a little. Well nothing is carved in stone here. I can always change that latter. Until next time Please Ride Safe and Remember to Always.... RESCUE, RESTORE & RECYCLE
Cheers, Hugh


Wednesday, June 3, 2009

Views From the New Milford Bike Path

Hello and Welcome,
Tuesday after work I loaded up the bike and went to Milford to ride the new Bike Path to Kensington. The first photograph shows where the trail ends at the S Milford road entrance to Kensington Metro Park. The other photos show views from along the trail. As you can see, it is very new. And the grass has not grown in yet. I can only imagine it will be even more beautiful when it does. I hear there are plans for the trail to link up with the bike- trail in the park. I believe the financing is already in place. I have to run, my other job is keeping me busy this week. Until next time Please Ride Safe and remember to Always... RESCUE RESTORE & RECYCLE
Cheers, Hugh


Cycling Blog Directory